Welcome to BOG, a Better Optimizer for GemRay!
This program should help you produce better faceted gemstones. At the very least, it will give some insight into how such parameters as facet angles, refractive index, and dispersion affect the optical performance of a stone. You do not need to know or understand the GemCAD and GemRay programs to use BOG.
The best way to learn BOG is to use it. Here, we will use BOG to optimize the angles for a standard round brilliant (SRB) cut in tourmaline. The Gemcad file for this tutorial, BOGTUT.GEM, is a "lowboy" variation of the SRB design, with 41 degree pavillion mains and 28 degree crown mains.
Installation and Starting BOG
Follow this link to a complete explanation
of the installation process. In addition to the BOG program, you should also
locate the BOGTUT.GEM file in the BOG_Docs subdirectory.
Within Windows, navigate to the folder containing BOG and double-click its icon. If this is the first time you are running the program, BOG will prompt you (like this) to locate the GemRay program. Note: version 1.43 or later of GemCAD is required. BOG will create its own working subdirectory, called BOGWork, and place a copy of GemRay in it. If you are using a non-English version of Windows, you may have difficulty on the first start-up. See here for help.
Two windows should then appear: the main BOG window and a DOS command window. The GemRay program runs in this DOS window under BOG's control. I like to reduce the font-size of the DOS window and move it to a corner of the desktop. This way, I can see that GemRay is working without using up a lot of real estate. Click on the MS DOS logo in the upper left corner of the window to adjust the font and hence window size. Although this is a fully functional DOS window, you probably shouldn't try to type commands into it while running BOG. Nor should you click elsewhere while the DOS window is producing output, since this can cause GemRay to freeze. The image below shows the BOG startup and DOS windows on my desktop under Win98. Other Windows versions may produce a somewhat different appearance. Follow this link if you don't see something like this.
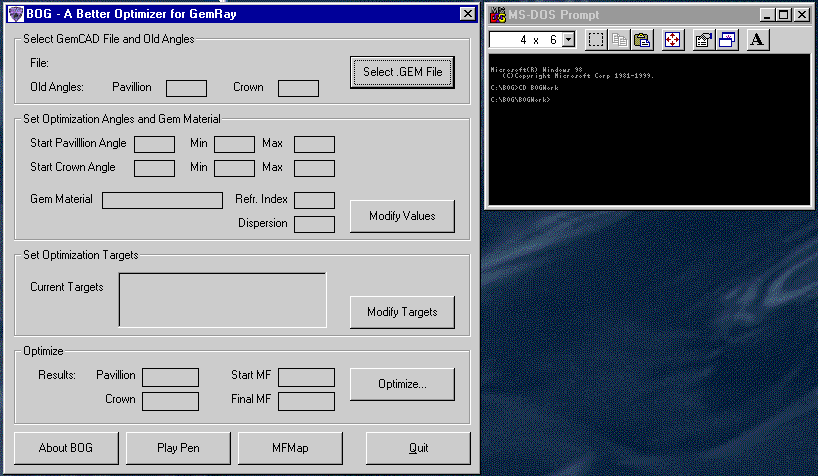
Optimization generally proceeds by setting values in the various panels moving from top to bottom in the main BOG window - i.e. selection of the GemCAD file, then angles and materials, then optimization targets, and finally the optimization itself. This tutorial will guide you through these steps.
|
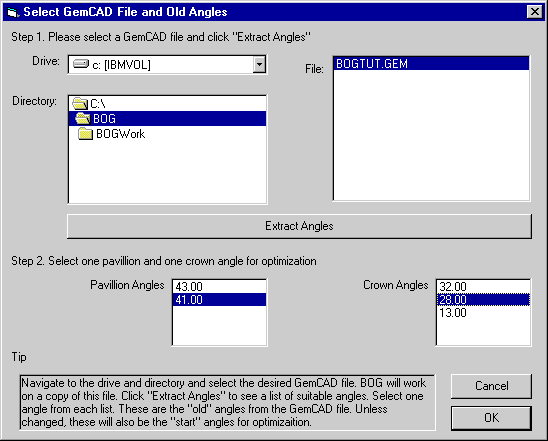 |
Why do I have to pick angles?
In the example shown above, we have selected the 41 degree pavillion angle and the 28 degree crown angle for optimization. BOG will vary these pavillion and crown angles, instructing GemRay to scale the gem accordingly using the tangent ratio method. Based on the output of the GemRay raytrace, BOG zeroes in on the scaling with the best performance. You have to select one pavillion and one crown angle to give GemRay a reference point for the tangent ratio calculation. Click here to learn more about tangent ratio scaling
|
 |
|
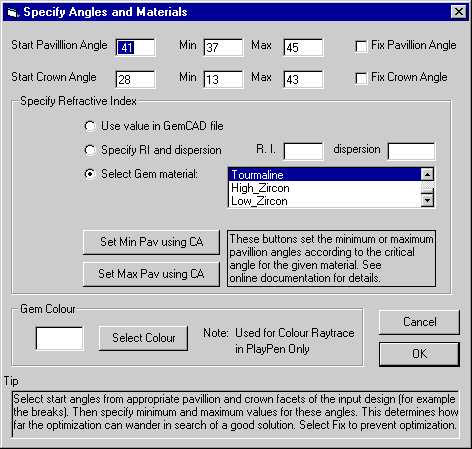
The middle part of this dialog box offers three options for telling BOG the refractive index of the gem material. Click Use value in GemCAD file to default to the value saved with the input ".GEM" file. If you select this option, the refractive index may appear as zero in subsequent steps, but BOG will instruct GemRAY to use the file value. You can also explicitly specify a refractive index and dispersion using the second option. Finally, selecting the third option then a gem material tells BOG both the refractive index and dispersion. Here, we plan to optimize for tourmaline, so click the third option and select "Tourmaline" from the scrolling list. The two buttons at the bottom of the Specify Refractive Index panel allow you to automatically set the minimum and maximum pavillion angles, based on the refractive index. In the case of Set Min Pav using CA, BOG uses the critical angle for windowing to establish the minimum pavillion angle (actually with a margin of 2 degrees). Similarly, Set Max Pav using CA sets the maximum critical angle to 2 degrees above the angle for which windowing occurs on the second reflection. Follow this link for a discussion of critical angles and the selection of maximum / minimum pavillion angles. The lowest Gem Colour panel lets you select a body colour for the gem material using a standard Windows colour picker. This is used in the PlayPen to try and give an impression of the design's appearance when cut in various coloured gemstone materials. The PlayPen Tutorial shows how to do this. Click Ok to proceed. |
|
A Brief Detour... |
|
 |
|
Optimize the Gem
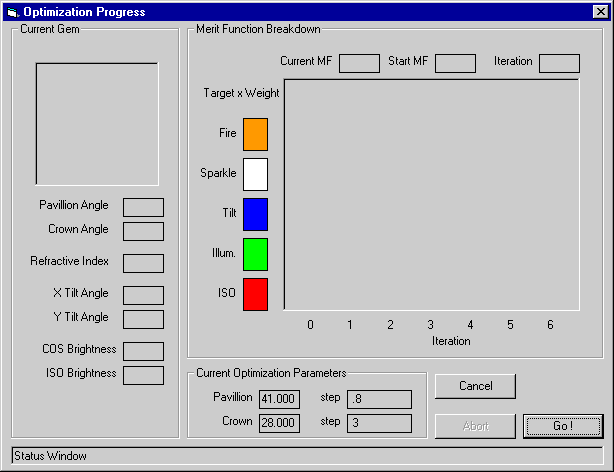
On the left is the Current Gem Panel. The gray box will contain the raytraced image of the stone, providing visual feedback of the optimization process. The text boxes showing gem angles, refractive index, and tilt angles contain the information as sent to the GemRay program. The lower two boxes report the Cosine and ISO brightness of the gem as calculated by GemRay. The large panel to the right (Merit Function Breakdown) will show information on the current Merit Function value. The Merit Function (or MF), is a mathematical value assigned to the quality of the gem, based on the optimization targets set in the previous step. Unlike golf, a higher score is better in BOG. Follow this link to a more detailed explanation of the Merit Funcion. In the simple case here, the MF is identical to the ISO brightness of the stone. The Merit Function plot will show the progress of the stone over multiple optimization iterations using a bar chart format. A single iteration corresponds to a cycle of varying the pavillion then crown angles for the best performance, and the zeroth iteration corresponds to the starting values. The contribution to the overal merit function from the various targets (ISO brightness, tilt performance, etc.) will be indicated by stacked bars of the appropriate colour (see the advanced tutorial for an example). With only one target selected in this case, the bar chart will be pure red. Below the Merit Function plot is a small panel (Current Optimization Parameters) showing the current gem angles and their step sizes in the optimization process. This is more than a repeat of the angle information in the leftmost panel. The part of the gem - pavillion or crown - currently being optimized will be highlighted in blue. If either angle exceeds the range specified in the Angles and Materials dialog box, that angle will be frozen, a situation indicated by red highlighting. Note also that BOG's optimization algorithm changes the angle step size, and useful optimization ceases when the steps become too small. Finally, a Status Window across the bottom of the window provides feedback on the interaction of BOG with the GemRay program. The exact command issued to GemRay appears here. When BOG is waiting for answers, this bar wil be highlighted red. Just Do It... Enough talking! Click "Go" to start the optimization process. By watching the merit function value and how BOG changes the angles, you should be able to figure out what BOG is doing. Follow this link to a more detailed discussion of how optimization within BOG works. Note also that BOG is pretty efficient - the Status Window should be red almost all of the time (i.e. waiting for GemRay, which does far more calculations). The optimization proceeds until the angle step size becomes too small or until the user clicks the abort button. If you abort the program please be patient and keep an eye on the DOS window running GemRay. It may take a few seconds for things to come to an orderly conclusion. Also, you should avoid clicking in other windows while BOG is working, since this can cause the DOS window running GemRay to "lose the focus" (i.e. no longer be the frontmost window) and freeze up. Clicking again on the DOS window should bring it back to life. |
|
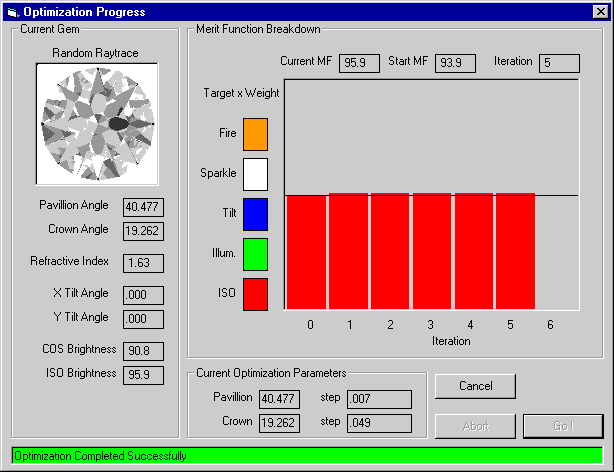
Results and Next Steps After a few iterations, BOG should inform you with a beep and a message in the status window that optimization is complete. The Optimization Progress should look something like this:
|
|
Note that the Merit Function, (in this case just the ISO brightness value), has improved by a couple of percent. Also, the angle step-sizes in the lower panel are now quite small. You can set the threshold step-size to terminate optimization by clicking About Bog then Customize BOG in the main window. Finally, note that BOG has shifted the paviliion angle slightly from the initial value, but it has decreased the crown angle dramatically, from 28 to about 19 degrees. Although it is unquestionably brighter, the quality of a gemstone design depends on more than just the pure ISO brightness. We address the question of whether this new design is really better in the next part of the tutorial. Click Cancel to close the optimization window. The angle values and merit function will appear in the Optimization panel of the main window. Congratulations! You have just optimized a gem design using BOG! Note that the original file is unchanged (and in fact untouched, since BOG worked with a copy). You must manually perform the tangent ratio calculations. Follow this link for a description of this procedure. Although you should feel free to start exploring additional options, now would be a good time to proceed with the next part of the tutorial. Follow this link to the PlayPen Tutorial. If you want to go try your new angles on some real rock, select Quit to end BOG. Click on the close box (x) or type "EXIT" in the DOS window if it doesn't disappear. Depending on your system, BOG may have typed "EXIT" for you, in which case you merely have to click on the DOS window and press Return |
Back to Main Page.
Documentation maintained by Tom Herbst. Last modified 17-Sep-2002