Tom's Transfer
What is this all about ?
This page describes a technique for quickly and accurately setting the appropriate
cheater (index splitter) angle after transferring a stone. It can also be used
to replace a dop in the machine under other circumstances - for example to touch
up the star facets after completing the table. The technique does not require
any further cutting or polishing of facets, and it can be used at any time to
restore the desired cheater angle (provided that there is a polished girdle
facet). The entire procedure takes approximately 5 minutes, and is very accurate.
Why is this necessary ?
(If you already understand cheater adjustment after transfer, you can skip
to the next section.)
Transferring a half-completed stone to a new dop involves two factors which
can cause misalignment of the pavillion and crown facets. The first of these
is simply removing the dop from the machine (which may be necessary or helpful
even when not doing a transfer). Despite various keying schemes, the second
dop is invariably somewhat rotated with respect to the first, requiring some
cheat to bring things into alignment. The second factor is imperfect transfer,
possibly due to misalignment or keying problems in the transfer jig, slight
shifting of the stone, etc.
To counter these difficulties, faceters have developed a variety of schemes
to determine the correct cheat angle. One common strategy is to cut a row of
facets after transfer. Incorrect cheat angle shows up as a slight spiral cut,
producing an offset between the last and first facets cut. The faceter applies
some cheat in the appropriate direction , cuts another row of facets, and checks
again. A few iterations should produce an even row of facets and hence the correct
cheat angle. Rob Kulakofsky wrote an excellent description of this method (AFMS
faceters list archive).
Unfortunately, there are several problems with this technique. First, it is
very slow, since accuracy depends on adjacent facets being cut to exactly the
same depth. Any overcut of a facet halfway through a row forces the faceter
to compensate or start over with that row. Achieving maximum yield from expensive
rough is also inconsistent with cutting multiple test rows of facets. In addition,
many gemstone designs do not have continuous facet rows. Check the first crown
cut. If it does not produce a continuous girdle line, you will have to cut all
the way around the stone at the largest angle. This may be problematic for some
gem rough. Finally, this technique does not help with the problem of replacing
the dop in the machine at times other than transfer.
Tom's Transfer
I got very frustrated with the cut and check technique for getting the right
cheat after transfer, and therefore started looking at alternatives. My experience
in astronomical instrument design started me thinking about possibilities for
optical alignment. The method outlined below is based on a standard technique
known as retroreflection, in which a beam of light returns exactly to its source
after reflection off the surface being aligned.
 |
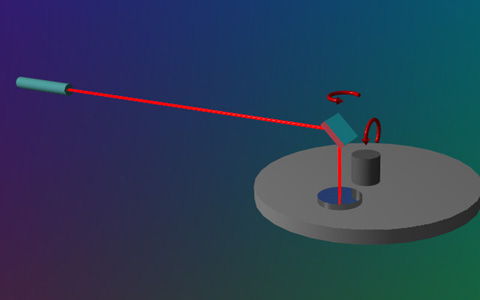
The figure at left outlines the basic principle. A mirror placed on a
flat reference lap bounces laser light exactly back along its incoming
path. A second mirror held at approximately 45 degrees allows the incoming
and outgoing beams to be horizontal, a configuration better suited to
long optical path lengths in typical rooms (no cathedral ceilings in my
little workshop!). Also, adjusting this 45 degree mirror is much easier
than positioning the laser for perfect retroreflection.
Note that if the light goes exactly back to the laser, the optical path
between the two mirrors is by definition exactly perpendicular to the
lower mirror, and hence to the reference lap.
|
|
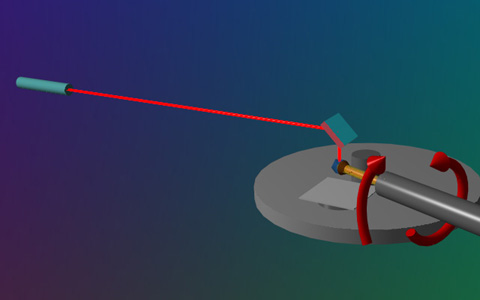
The next step is to tie the orientation of the gemstone into this reference.
Setting the protractor to 90 degrees and selecting an index exactly opposite
a girdle facet should make that facet also parallel to the reference lap
and upward-facing. If the gem is properly aligned, the laser should retroreflect
off the girdle facet just as it did off the lap mirror (I usually cover
the lap mirror with paper to minimize confusing reflections). Adjusting
the index splitter (and protractor) for perfect retroreflection gives
the proper cheater angle. Voilà.
|
 |
What you will need.
To do this yourself, you will need the following items:
A Laser Pointer
2 Small (25-50 mm, 1-2 inch) mirrors
A jig to hold the 45 degree mirror
Laser Pointer. I use a cheap laser pointer purchased at a discount house
for less than $20. The only requirement here is that the laser stay on continuously.
My pointer has a recessed momentary-on switch, which I hold down with a breath
mint and an elastic band.
Mirrors. Almost any mirror will do. The one lying on the lap should
provide an accurate reference. This means it should either be a first surface
mirror face down, or at least a double surface mirror that is very parallel.
You might be able to judge how parallel such a mirror is by rotating it 90,
180, and 270 degrees then checking whether the spot stays fixed after retroreflection.
Edmund Scientific has suitable inexpensive mirrors.
Jig to hold 45 degree mirror. I began with a hobbyist's "third
hand" - the gadget with alligator clips and wing nuts. This was difficult
to control, so I rigged together a mirror holder with screw adjustment. For
the ultimate in ease, try to scrounge surplus hardware from an optical bench.
Like this.
Detailed Instructions
1. Place the lap mirror on a clean reference lap. I use a mirror approximately
30 mm in diameter laid on my master lap. Place the mirror where you usually
polish. The mirror will rest on top of any small hills on the lap, averaging
the slope over the area it covers.
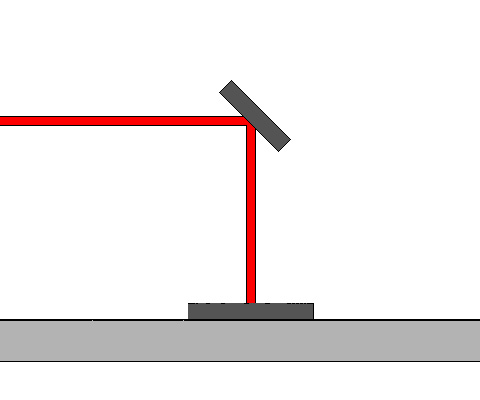
2. Setup up 45 degree mirror and laser. I place the mirror holding jig
directly on the lap, so that the 45 degree mirror is directly above the lap
mirror and pointing across the room to the table where the laser sits.
|
3. Align laser to lap mirror. See figure at right. Turn on the
laser and adjust it so that the beam strikes the 45 degree mirror. If
you have trouble getting it to line up and stay put, try embedding the
laser in some plasticene (Play-Do). Adjust the 45 degree mirror so that
the spot of light returns to the laser. This does not have to be exact
, as long as you send the laser back to the same spot in step 4.(see here
for a discussion about this).
|
 |
|
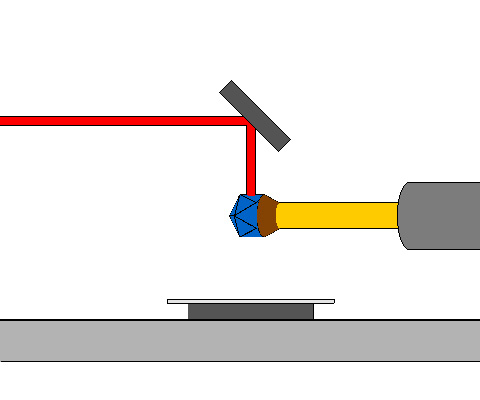
4. Align the gem to the lap. See figure at right. First, cover
the lap mirror with a tissue to prevent distracting reflections. Then
dial in 90 degrees on the dop arm and set the index so that a polished
girdle facet faces upward (do this from the design, not by eyeball! For
instance, if there is a girdle facet at 24 on a 96 tooth gear, set the
index to 72). Make sure that the downward-travelling laser beam strikes
the girdle facet. A small white index card can be a great help here. Reflection
off the facet then the 45 degree mirror sends the light back toward the
laser pointer. You might get addtional confusing reflections off other
facets. Inking unused facets helps here. Adjust the protractor and cheater
angles until the spot returns exactly to the laser (or the location it
was before). That's it. Do some reality checks (step 5) then start cutting!
|
 |
5. Do some reality checks. You should check the laser-lap mirror alignment
afterward. Just move the stone out of the laser beam and remove the tissue covering
the lap mirror. The spot should stay put. There are some additional useful checks.
For example, you should check the spot location using different facets. If the
spot moves around slightly, repeat step 4 using the facet which represents the
approximate middle position. How much variation is acceptable? Compare the amount
of cheat you have to apply to bring the spots to the same point. If this is
small compared to the amount of cheat you apply during normal faceting, you
should be all right. Read some additional comments about accuracy here.
Some Remarks about Accuracy
This optical alignment technique is very accurate. We can estimate the cheater
angle error using the laser spot uncertainty and some simple geometry. For example,
with my setup, I can usually retro-reflect the laser to within 1 mm or so of
its original location. With a total path length from the gemstone to the laser
head of about 2.5 meters, this corresponds to an angular accuracy of 1 part
in 5000 (note that when you rotate a mirror - or a gem facet - by one degree,
the reflected light is rotated by 2 degrees). One part in 5000 corresponds to
approximately 0.01 degrees or 0.7 minutes of arc. For a 96 index gear, it is
about 1/300th of an index setting.
Is this accurate enough? The simple answer is yes, for at least two simple
reasons. First, you will likely find as I did that aligning this way produces
no discernible error with the traditional cut-and-check technique. Second, you
will notice that cheater adjustments that you would normally consider minute
during faceting produce significant shifts of the laser spot.
Improving Accuracy
A longer path length would allow greater accuracy, although it becomes harder
and harder to judge the center of the spot of light, particularly that produced
by an inexpensive laser pointer. Yes, a HeNe gas laser with less beam divergence
would improve things.
Imperfect retroreflection - that is returning the laser spot to a point slightly
displaced from the laser head - does introduce some inaccuracy. The figure below
explains why.
A Word of Caution
This technique should simplify the procedure of finding the correct cheater
setting, but it is subject to error. Obviously, referencing to the polished
girdle facets in this way presumes that you have an accurate girdle. Bumping
or moving the lap, mirrors, or laser during the measurement can cause problems
as well. As a matter of practice, I usually cut a test row of facets to confirm
accuracy, but I rarely have to cut more than one row!