Merit Function Mapper Tutorial
The Story so Far...
We have been trying to optimize a “lowboy” standard round brilliant.
By using BOG's optimize facility, coupled with some follow-up checks in the
PlayPen, we have managed to produce a better gem. In this final part of the
tutorial, we will use the Merit Function Mapper to investigate the performance
of the design over a range of pavillion and crown angles.
|
If you aren't
continuing from the earlier parts of the tutorial, please read and follow
the instructions in this box.
And don't worry
if you haven't gone through the QuickStart,
PlayPen, and Tilt
Performance sections of the tutorial - they are not necessary to understand
and benefit from the MF Mapper.
1. Click Select .GEM File in the main BOG
window. Choose the file called BOGTUT.GEM and click Extract
Angles. Choose the 41 degree pavillion angle and the 28 degree
crown angle from the lists then click Ok.
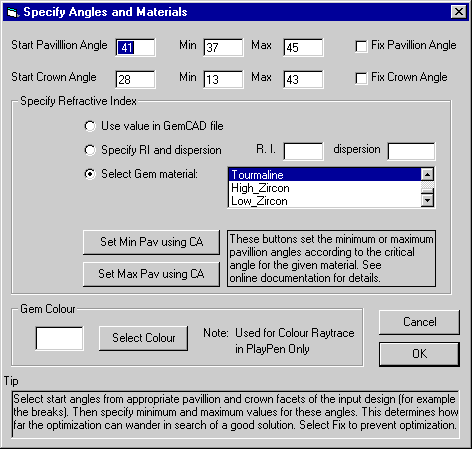
2. Then click the Modify Values button in
the panel labelled "Set Optimization Angles and Gem Material"
panel. Enter the angles as shown here.
3. Under "Specify Refractive Index," choose the
Select Gem Material option and choose Tourmaline from the scrolling
list. You have now told BOG which file, range of angles, and gem material
to use in the MF Mapper. Click Ok to return
to the main window
|
 |
|
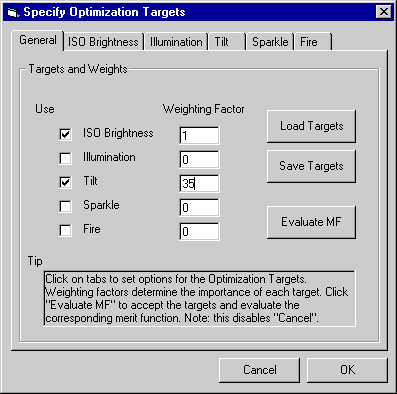
4. Click the Modify Targets button in the
main BOG window and set the check marks and weighting factors as shown
at right.
5. Select the Tilt tab, then click on the
up direction arrow (Direction 1). Set the maximum tilt angle to 20 degrees
and the Brightness Variation for Zero Merit
to 10. When you are done, the Tilt panel should look like this.
6. Click Ok to return to the main BOG window,
and you're ready to go!
Don't worry at this stage if you don't understand all these steps. The
other sections of the tutorial clarify the procedure, and you can go back
through them at any time.
|
 |
A Quick Review
BOG seeks to improve the quality of a gemstone design by maximizing its Merit
Function (MF). The MF is a mathematical value assigned to the quality of the
gem, based on a series of optimization targets, such as brightness, tilt performance,
and dispersion. The Optmize feature of BOG varies the pavillion and crown angles
in such a way as to always increase the Merit Function. Optimization ends when
no further variation in the angles improves the situation - in mathematical
terms, BOG finds a maximum in the Merit Function surface (see a more detailed
explanation here).
There is no guarantee, however, that this is the overall best design. It may
be a “local maximum” - in other words the highest MF value reachable
from the initial starting point without going "downhill." Even if
it is the best design, the choice of pavillion and crown angles may produce
a less-than-pleasing reflection pattern, or the piece of facet rough may only
allow a certain range of angles due to its shape, internal flaws, etc.
The MF Map
This is where the Merit Function Mapper or MF
Map comes in. It automatically evaluates and plots the Merit Function for a
range of pavillion and crown angles. By interactively exploring the results,
you can choose the best combination given the circumstances.
The Merit Function Mapper is much easier to demonstrate than to explain, so
let's get started!
In the main BOG window click the MF Map button.
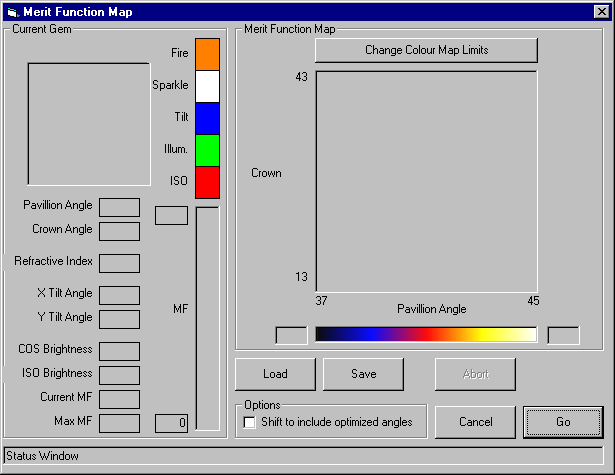
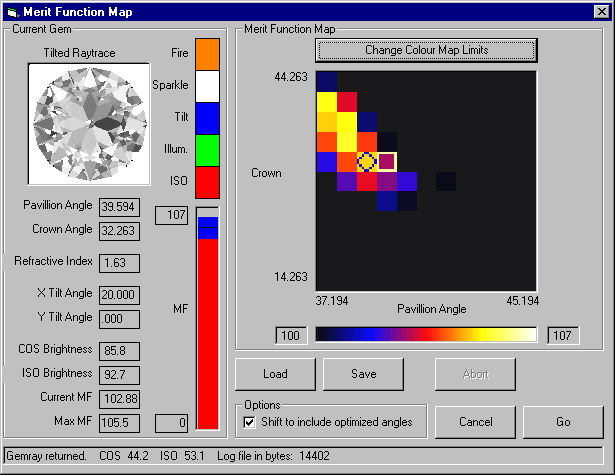
The MF Map window should appear:
Take a moment to examine the contents of this window. If you have played with
the other parts of BOG, much of this should look familiar.
On the left hand side is a panel containing information about the gem design
currently being examined. The gray panel on the upper left will contain the
raytraced image. Relevant information, such as the angles, refractive index,
brightness, Merit Function values etc. will appear in the appropriate boxes.
To the right of these boxes, a vertical bar labelled "MF" will show
the breakdown of the current Merit Function- i.e. what fraction is ISO brightness,
versus Tilt Performance, etc. This panel reproduces the information shown in
the bar plots in the Optimization window (see the QuickStart
tutorial for an explanation). The labelled colour swatches above the MF panel
serve as a reminder of the colour coding for the various components of the Merit
Function.
The large panel to the upper right will contain the Merit
Function Map itself. Note that the axes correspond to the range of Pavillion
and Crown angles set in the Angles and Materials dialog box. The coloured bar
below the MF Map shows the current colour table, and the blank boxes at each
end will report the MF value corresponding (in this case) to black and white.
Clicking on the Change Colour Map Limits button
above the MF Map will allow you to vary the displayed range of MF values (don't
do this yet, however).
As you will see, calculating an MF Map (particularly with many Optimization
Targets) can be quite time consuming. For convenience, BOG provides Load
and Save buttons below the Merit
Function Map panel. These allow you to store the MF Map in a disk file
and retrieve it later for further study.
At the bottom of the window is a panel containing an option to shift the map
to include optimized angles. When selected, this option shifts the MF Map slightly
to include the exact current optimized angles. Try it. Notice how the plot limits
have changed.
Finally, in the lower right corner, there are a series of buttons to control
the mapping procedure. We are ready to start so click on the Go
button !
Mapping the Gem
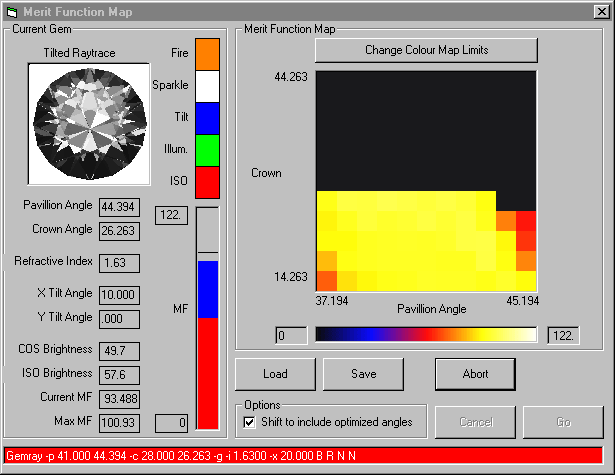
BOG will begin analyzing the ISO Brightness and Tilt Performance for the gem
for all combinations of Pavillion and Crown angles. As it goes along, the program
starts mapping the Merit Function, based on an initial guess of the maximum
achievable MF. Note how the appearance of the gem and the numerical values vary
for the various angles. The MF bar records what
fraction of the total Merit Function comes from ISO Brightness (red) and what
comes from Tilt Performance (blue) BOG is storing the raytraced images and all
numerical values, so you can interactively explore things when the calculations
are complete...
Be patient - the process can take several minutes, depending on the speed of
your computer and the complexity of the merit function. Note that you can Abort
the calculation at any time, although you should allow a few seconds for things
to come to an orderly conclusion before trying anything else.
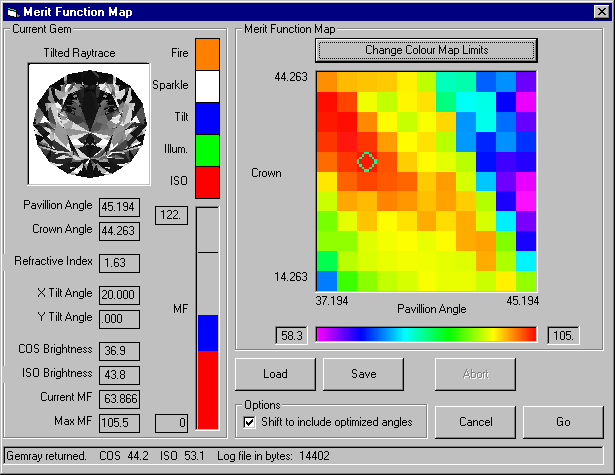
When it is complete, BOG rescales the MF Map between its maximum and minimum
values and presents the results. Note that one box has a diamond shaped symbol.
This locates the current optimal pavillion and crown angles, i.e. the result
of the most recently completed calculation in the Optimize...
window.
Click on the colour table bar (below the “Pavillion Angle” label).
This switches to a different colour scheme. Click repeatedly to cycle through
the available colour tables. Here is my favourite, a classic rainbow:
Note the trend in the Merit Function Map. The highest MF extends from the upper
left to the lower right of the MF Map. It seems that lower pavillion angles
coupled with higher crown angles produce the best results. Increasing the pavillion
angle requires a corresponding decrease in the crown angle for good performance.
Let's focus on this “ridge” of high MF values. Click on the Change
Colour Map Limits button and set the upper limit to 107 and the lower
limit to 100. Click Ok to return to the MF Map
window. Note that it is now easier to distinguish the highest MF values, and
that the uninteresting areas of the map (lower left and upper right) are not
occupying parts of the colour table and hence our attention.
The Best Gem (?)
Now click on the brightest point in the map:
BOG highlights the point you clicked for reference. In the Current
Gem panel, the program has retrieved and displayed the raytrace and numerical
values associated with this selection of Pavillion and Crown angles.
Two questions immediately arise:
(1) Why didn't BOG find the highest point during optimization? The optimized
gem (diamond symbol) has a slightly larger pavillion angle and a slightly lower
crown than the highest point. The answer comes from a careful look at the figure
above. BOG approached its solution by varying the pavillion and crown angles
one at a time - in other words by stepping along the X then along the Y axes
in the MF Map. Getting from the optimized "peak" to the true "peak"
means going "downhill" along either the X or Y directions. BOG's peak
finding algorithm doesn't allow this - it finds the highest accessible point,
which in this case is a relative, not absolute maximum. Nevertheless, the top
of this MF "mountain" is fairly flat, and the difference between the
optimized and true maxima is very small (105.0 vs 105.5 in the Merit Function).
This example shows why both an Optimization run
and an MF Map are essential to understanding the
performance of a gem.
(2) Is the highest point in the MF Map the best
gem? Although this solution has the highest Merit Function, it does not necessarily
correspond to the best gem. Note, for instance, that the true "peak"
has an ISO brightness of only 85%. Also, to my eye, the pattern of reflections
in the raytrace is not that pleasing.
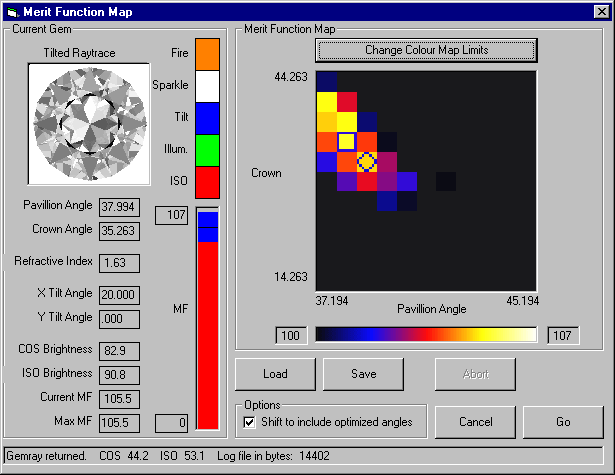
Try clicking on other points on the MF Map to find a better solution. Here's
the one I like:
Although its MF value is a couple of percent lower, the ISO brightness value
is significantly higher and the reflection pattern more aesthetically appealing.
On balance, I would rather cut a gem with this combination of angles than the
that corresponding to the absolute maximum MF. Before heading off to the faceting
machine, however, I would directly check for adequate tilt performance in the
PlayPen.
This concludes the Merit Function Mapper Tutorial.
Feel free to explore!
Back to Main Page.
Documentation maintained by Tom Herbst. Last modified
18-Sep-2002


