BOG and the Ringo Challenge
Jim "Ringo" Perkins uploaded an SRB gem design, then issued the following
challenge:
My results for face up
and tilt brilliance follows:
Face up ISO=93.3% COS=87.6%
10 degrees tilt ISO=71.5% COS=65.6%
20 degrees tilt ISO= 62.9% COS=54.1%
My challenge is this. You
must use the symmetry, I.R. and indicies I did. You can change angles and
proportions to whatever you like. See if you can get better results.
This is exactly the kind of problem for which BOG is useful. In fact, optimization
of an SRB for ISO brightness and tilt is the focus of the BOG online tutorial
(click here to visit
that tutorial).
Step 1 - Examine the Problem
|
Jim's "Optimizer" design is already very good, and his boast is justified
- " Go ahead, make my day and take a shot at the
gunslinger. :-)".
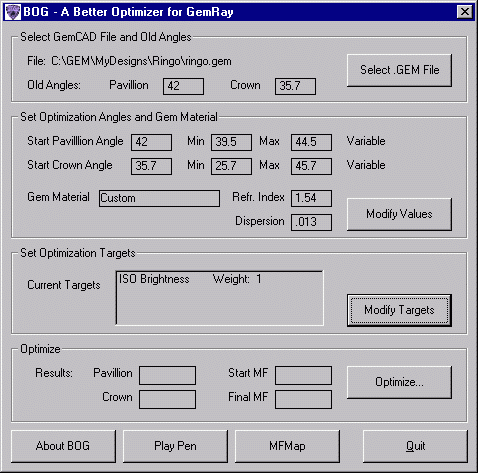
I began by loading the .GEM file into BOG and entering the values shown
at right. Note that I have selected the 42 degree pavilion angle and the
35.7 degree crown angle for reference.
|
 |
|
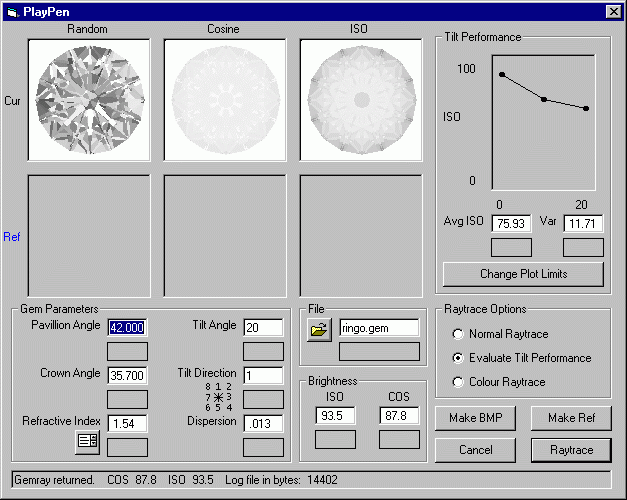
I then fired up the PlayPen:
The image at left shows the raytrace and tilt performance of the input
"Optimizer" design.
Note the large variation in ISO brightness with tilt angle (plot in upper
right). The variation in ISO from 0 to 10 to 20 degrees is almost 12%
per step. For a clarification of Avg ISO and Var, see here.
Learn how to use the PlayPen here.
|
Based on this tilt variation, I set up the Merit Function with the following
weights: ISO -1 , Tilt - 30. For tilt, I set the Brightness Variation for Zero
Magnitude (BVZM) to 15.
Aside: Why Tilt 30 and BVZM 15?
The input design has an ISO variation of 12%. The Merit Function contribution
for tilt is MF Contribution = (1 - Variation
/ BVZM) * Tilt_Weight (find
out more here).
Therefore, at the start, the design will have about
1/5 of the Tilt_Weight as contribution (1-12/15=0.2). I know from experience
that it is a good idea to start with the Tilt contribution about 10% of
the total. Therefore, a Tilt_Weight of 30 will be about right. The other
way to get a good starting value is to play with the weights until the
proportions of the colour bar look right in the Optimizer. You can click
directly on the Evaluate MF button in the
dialog box where you enter the weights. If this all seems rather opaque
to you, don't worry. Carry on reading, and go through the BOG tutorial
in detail at your leisure. |
Step 2 - Examine the Landscape
Before proceeding to the optimization, I like to take a look at the Merit Function
"landscape". From the main BOG window, click on the MF
Map button and press Go. After a few minutes
(about 5 minutes on my 4 year old PC), you should see the following. You can
learn more about the Merit Function Mapper here.
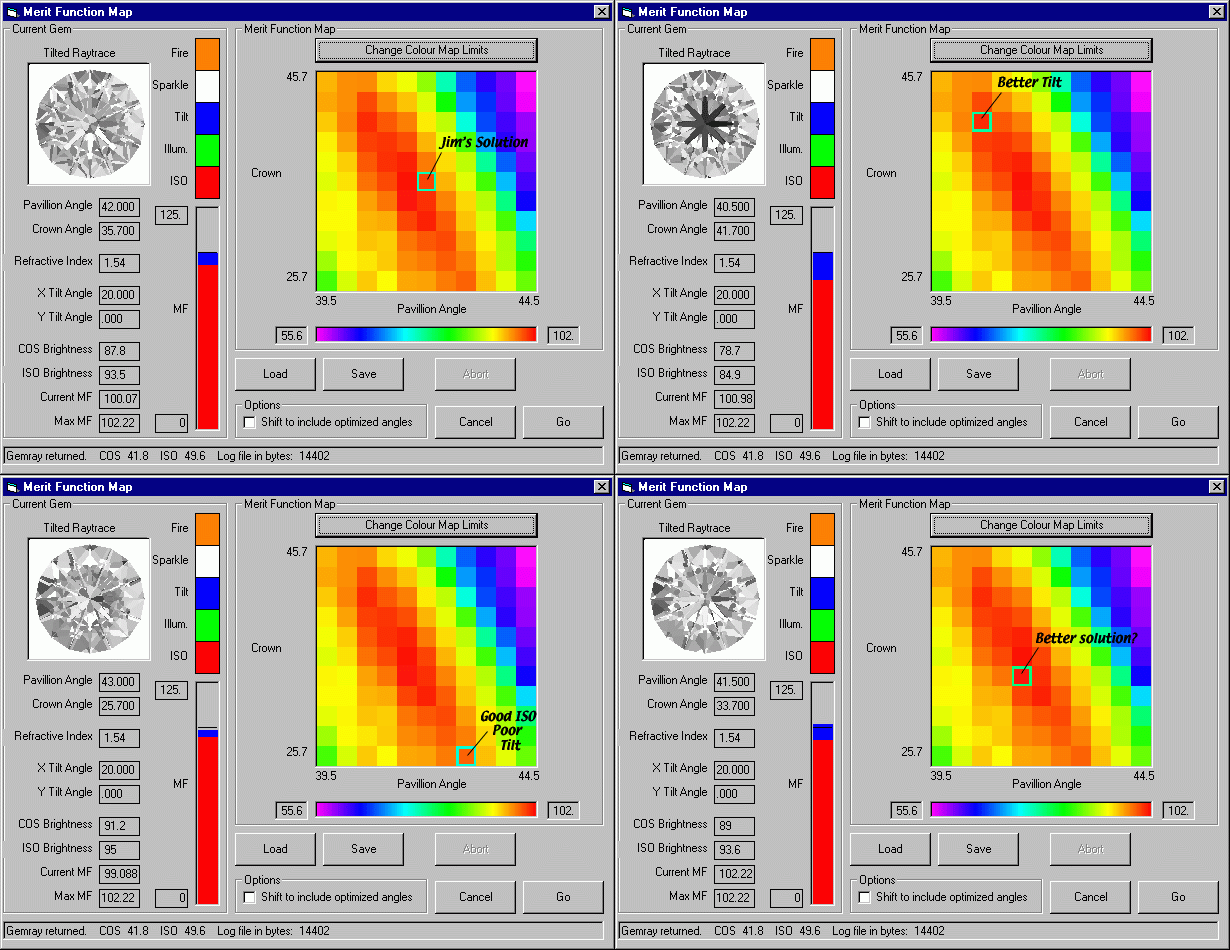 |
This is a map of the stone performance (the Merit Function)
for a range of Crown and Pavilion angles. Try clicking on various points.
On the left, you will see the raytrace for that pair of angles, as well
as the ISO/COS brightnesses and Merit Function values. Note the coloured
bar - it indicates the total merit function value and the contributions
due to ISO (red) and Tilt Performance (blue).
Note that there is a "ridge" of good performance, ranging from
upper left to lower right. In general, high crowns work well with low
pavilions and vice versa. |
A little exploration of this map can be quite instructive (click on Save
to place a copy on disk for later study). For example, to the upper left (high
crown, low pavilion), the tilt performance is very good - the MF bar shows lots
of blue. Unfortunately, the ISO brightness is considerably worse, and the reflectance
pattern in the raytrace is unappealing. To the lower right, the ISO is very
high, but the tilt performance is poor. Jim's solution, although it does not
have the absolute highest merit function value, represents a good compromise
between better tilt and better ISO. I also like the reflectance pattern.
A hint of somewhat better performance lurks just to the lower left of Jim's
solution. The "Better Solution?" highlighted above shows slightly
higher ISO than Jim's, and qualitatively better tilt performance. Clearly, exploring
near Jim's solution may be productive.
Incidentally, the aesthetic appeal of the reflectance pattern is a matter of
taste, but I actually prefer Jim's to the "Better Solution" in this
instance. The relative value placed on face-up ISO Brightness,
Tilt Performance, and Reflectance
Pattern highlights a major difficulty in assessing the
"quality" of designs - one man's food is another man's poison, to
paraphrase Lucretius (had to look that quote up...isn't the Web wonderful?).
Maybe the gunslinger is safe after all?
Step 3 - Zero in on a Solution
Our exploration of the Merit Function Map indicates that Jim's solution is
as good a place as any to start Optimization. Return to the main BOG window
and click Optimize. After about a minute, the program should converge on the
following:
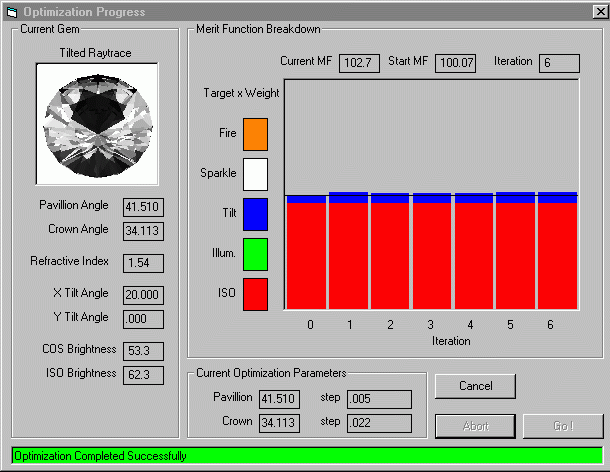 |
As expected from the MF Map, this solution
has lower crown and pavilion angles than the original. Based on the selected
Merit Function and weights, it is about 3% better.
Trying to "force" better tilt performance by increasing the
appropriate weighting factor will not be very productive. This distorts
the Merit Function "landscape", and will push BOG into a solution
with considerably worse ISO brightness. Take a minute to try Tilt_Weight=50
to see this effect (or follow the BOG
tutorial). |
Step 4 - Do a Sanity Check
We seem to have nudged a bit more performance from Jim's Optimizer design,
but it's worth taking a look in the PlayPen to be sure. Click Cancel
in the Optimization Progress window then start the PlayPen
from the main BOG window. Note that the program has thoughtfully inserted your
optimized angles.
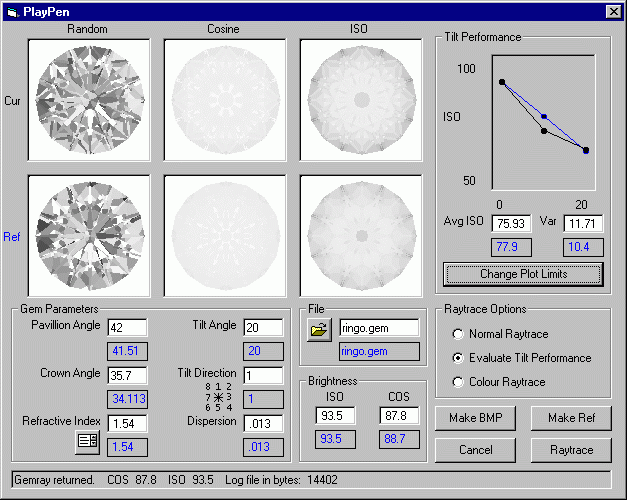 |
Select the Evaluate
Tilt Performance option and generate a Raytrace
for 20 degrees, Tilt Direction 1. Click Make
Ref to place the optimized gem in the reference channel. Note that
all the relevant data are copied to the lower Blue
panels.
Enter the original pavilion and crown reference angles then Raytrace
again.
The tilt performance plot shows that we have managed to improve the brightness
of the gem at intermediate angles without harming the face-up performance. |
This ends BOG's take on the Ringo Challenge.
Note that the original file is unchanged (and in fact untouched, since BOG
worked with a copy). You must manually perform the tangent ratio calculations.
Follow this link for
a description of this procedure.
The Score Card:
The optimization procedure described here took about ten minutes on a 4-year
old Pentium PC. More effort may produce better "objective" results,
although it has been my experience that less tangible factors (idiosyncrasies
of a particular stone, personal taste in reflectance patterns, etc.) are more
important in refining the final exact angles.
The following table summarizes the results. In each box, I have coded the Original-->BOG
Optimized values by blue-->red.
| |
ISO |
COS |
| 0° |
93.5
-> 93.6 |
87.8
-> 88.7 |
| 10° |
71.4
-> 77.9 |
65.6
-> 72.3 |
| 20° |
62.9
-> 62.3 |
54.2
-> 53.3 |
As expected from the PlayPen, the most significant change is a 7% increase
in ISO brightness at intermediate angles.
Important Note: GemRay and hence BOG use the tangent
ratio method to scale either the crown or pavillion. The tangent ratio
method adjusts a gem's angles without altering its plan view, i.e.
the facet outlines when seen from above. See here
for more info.
Jim's challenge allows a change in "angles and proportions,"
which presumably includes changing individual angles, not the crown or
pavilion as a whole. Very few gem designs allow a change of individual
angles without messing up meet points. The SRB is one such design, however.
There may very well be a design with better performance, but it is not
one that is reachable from Jim's design via the tangent ratio. |


